Technical Supplement No BKTSR001 - Scuttle & A-Post Repair |
The Rover P4 Drivers Guild make every effort to ensure that the information and advice published is reliable and make proper reference to safety procedures. We are unable to accept responsibility for injury, damage or loss resulting from omission or error. |
Workshop Manual Reference Section R (All models) |
Compiled: Barry Kensett This revision 18 January 2014 |
Rover P4 Scuttle and A - Post Repair Techniques
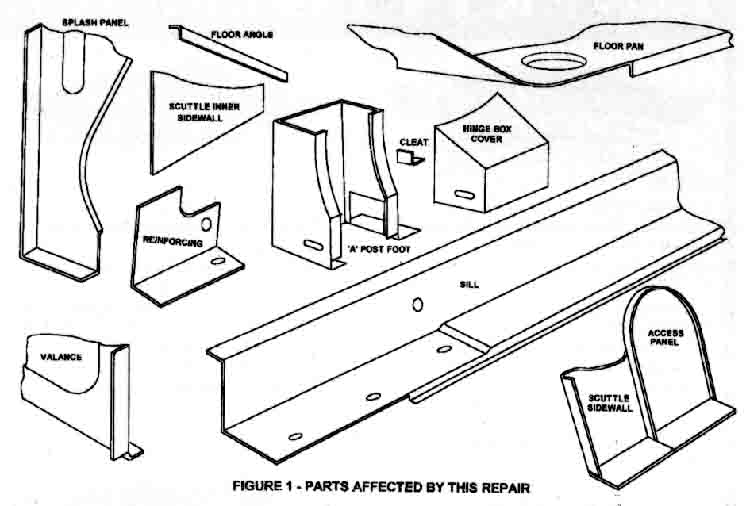
In the late fifties and sixties, the corrosion resistance designed and built into our cars was far inferior to current day practice. The Rover may be considered to be better built than most but some of the design features are poor by today's standards. The materials and techniques available were also inferior in most respects, it was unusual to use zinc coated materials (unless you had a Volvo) which were difficult to spot weld and paint, and were more costly than bright steel. There were no effective interfay compounds which could be spot-welded through to give protection in the many flange joints, there were many closed boxes in the body structure which had no internal paint or wax treatments and little thought was given to drainage leading to water traps. The area behind the front wheels of the P4 is very prone to corrosion and it is extremely rare to find a car that has not been damaged in this area. Figure 1 illustrates the components likely to be affected to some degree.
It is not difficult to review the phases of the corrosion process which starts with the effective blasting of the splash panel and valance behind the front wheels with sand, water and saline solution. The rubber flap seal on the splash panel may not be a good seal. Once the splash panel is penetrated, the saline solution is partially trapped in the closed box which did not originally have the benefit of any drain holes. The bottom of the sill extension, the scuttle sidewall and access panel ( this exists to let the spot-welder arm in during manufacture) and the parts around the base of the A-post are immersed and quickly corrode, particularly where the many flanged and spot welded joints provide perfect electrolytic batteries. Keeping the car in a nice warm garage would accelerate the process! Rain from the top adds to the problem as the only escape path for water draining from the windscreen and bonnet area is down the outside of the scuttle and onto the A-post from above. It is possible to see into the base of the A-post through the access hole behind the scuttle trim panel but this only reveals part of the problem area.
Meanwhile a second attack would be taking place once the inner valance is penetrated allowing water into the trap formed by the horizontal spot-welded joint between the scuttle inner sidewall and the vertical face of the sill extension. A path is now open for the sand-blasting to strike the floor in the footwell area around the handbrake apertures and perforation here usually occurs. Once the box around the lower door hinge is perforated, water enters this area affecting the door hinge itself and then running back under the sill mats to perforate the sill from above. Eventually the sill structure around the body mount starts to break out compounded by the breakdown of the outer end of the front outrigger which is another repair topic in its own right.
There is no standard repair for the areas of damage, the rate of corrosion depends on the usage of the car. It will be different on both sides of the car and the course of events will be modified by any superficial repairs which may have been carried out during the car's life.
On my own car I knew that the usual problems existed but were masked by a plate which had been welded to the bottom of the front wing and folded up and tacked to the scuttle sidewall. This was obviously done some years ago as it had perforated in a couple of places. On the other side it was possible to hear the rust debris bouncing around if the bottom was tapped with a hand! The timing of the repair was eventually precipitated by the breakdown of the body mounting in the sill and the outrigger and I decided to tackle the whole area as a winter project.
The Repair Process
It is necessary to remove the front wings as described in the workshop manual; in my case it was necessary to cut the wing at the base due to the temporary repair. The front valance had also been tack welded to the wing! The wing must come off before the doors to get access to the bolt through the A-post; the hinge bolt through the sill will probably need grinding off. The doors and hinges can then be removed and care must be taken with the sponge seals unless they are due for replacement. I would recommend that the bonnet is also removed. Front seats, carpets and handbrake will need to come out if the floor is perforated and the aluminium trim strip along the top of the sill will need removal followed by any insulation pads within welding range. The front screws of this trim may need the gentle application of an impact driver to loosen them. Underseal will need to be removed in areas where welding is needed; a hot air gun and scraper is the easiest way to do this. The rubber seal on the splash panel should be removed if it hasn't dropped off before.
The car must be raised and if a lift or pit is not available, I find that lifting the car about two feet is about the right compromise between access and arm reach. I removed the front outriggers as these were also due for replacement and access to the sill is easier without these.
Some repair parts are available, I found that the sill extension section and the scuttle side access panel save some manufacturing time. The section available for the scuttle sidewall was a quarter of an inch too narrow and for my car; I made a piece to fit. I used 18 swg mild steel sheet for all repairs and I make patterns with card first before cutting the metal. I use a nibbler to roughly shape the sheet and Gilbows and file to finish off. All folding for this job can be carried out in the vice with a few bars and a hard wood block. Before attacking with a saw and grinder, the job can do with a lot of hard looking at to determine the best place for joining to sound metal. The old joiner's adage "Keep your wood as long as you can as long as you can" applies. Care must be taken in cutting away too much at one go and risk losing the shape.
The scuttle sidewall should be cut back to sound metal and the access panel ground out to help access to the sidewall.
The sill repair section is sized to lap over rather than butt weld to the sill; this means that any sound sill can be left in place which assists with alignment. If there is damage to the sill behind the coverage of the repair piece this should be repaired with inserts, butt welded in place. Due to the corrosion trap at the top flange of the front end of the sill, it is unlikely that there is sufficient material hanging from the scuttle inner wall to meet the new section. This must either be replaced by a lap welded extension or plug welded to the angle on the floor although the latter is tricky due to the thickness of metal on the down hanging flange and the difficult access. The sill repair can be clamped in place at the body mount position and lined up with the remains of the splash panel. When confident on position, the holes for the body mount and bottom hinge bolt can be drilled to allow the section to be bolted up.
The A-post foot can then be repaired as necessary; on one side I had to replace the front wall, back and base. The hinge box cover can then be welded round the outside and the hinge should be offered up at this stage to make sure that there is adequate clearance.
The floor pan should be repaired before the sill is welded in for better access. I used insert repairs but lap welds would be satisfactory here if you do not mind the appearance. Shaping the pressed area around the handbrake hole is a bit tricky; I beat it roughly to shape on the bench, welded it in and then heated the double curvature to bright red and tapped into shape in situ.
The sill extension can then be attached permanently and for this I found that bronze welding is best as it penetrates the lap better than welding. This is attached at the rear end of the horizontal and vertical laps from below the car and to the A-post foot faces from the top. The scuttle inner wall is then connected to the vertical flange and I used rivets here to enable the use of a chromate interfay material to prevent corrosion at this vulnerable joint. Plug welding would be satisfactory and as good as original build.
The scuttle access panel can now be offered up and the forward section of sidewall made to suit. This is butt welded to the sidewall and the access panel is edge welded in place. The aft flange is heated and tapped back close to the A-post and welded. The bottom flanges are bronze welded to the sill section (remove the zinc coating first).
The splash panel can now be cut back to sound metal and a new section fabricated and butt welded in place. Similarly the valance needs an insert repair and finally the four flanges of the valance, sill, sidewall and splash panel are edge welded. I sealed all joints in this area with bronze weld to help weather resistance and close up holes exposed to the front wheels.
If the splash panel is badly corroded higher up, it is possible to obtain a new repair panel. Mine was not bad enough for this but was perforated intermittently adjacent to the forward projecting flange. Welding in this area would not be successful, there is insufficient sound metal to go at and the heat would set fire to the trim behind the dash. I straightened and ground the flange to the original projection. I then made section of angle to fit onto the face of the splash panel far enough away to be lap welded and flanged up and over the projecting flange and clamped with chromate interfay rather like a Mini body seam.
All metal was then primed with a damp resistant primer (E.g. Rustoleum 769), seams sealed with 3M body caulk, black enamelled and Waxoyl black underseal to finish.
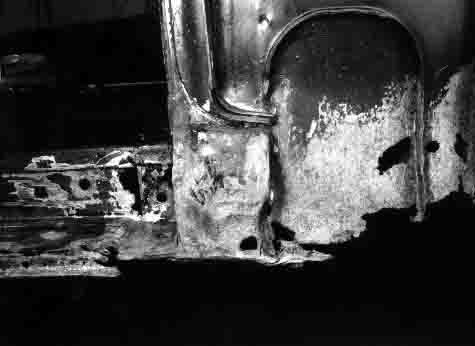
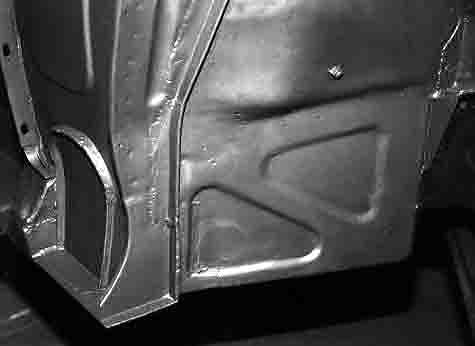
Bottom door hinges should be checked for wear and repaired if necessary (see Overdrive No. 95, March 1994,Page 20 ) before replacing doors. Front wings and bonnet are replaced as described on workshop manual. With care to rustproofing, the above repair job should never need to be done again. Pictures below show before and after conditions of the above repairs.
©B.Kensett 2023